Hello! I’m joining Heather from Beauty that Moves for This Week in My Kitchen again this week. It’s been a busy week and I tried to capture as much as possible. If you have any questions, feel free to ask in the comments.


 See you next week!
03 Thursday Apr 2014
Posted in Blog
Hello! I’m joining Heather from Beauty that Moves for This Week in My Kitchen again this week. It’s been a busy week and I tried to capture as much as possible. If you have any questions, feel free to ask in the comments.
See you next week!
27 Thursday Mar 2014
Posted in Blog
I’m joining Heather, from Beauty that Moves, in a blog hop this week featuring pictures from my kitchen. Heather has been a huge inspiration, providing our family with so many delicious recipes that have become staples, so I am thrilled to be a part of this! I am going to try to snap more pictures and post again next week.


23 Sunday Mar 2014
Posted in Blog
Tags
cilantro juice, clean the omega juicer, dan mcdonald green juice, dara dubinet green juice, juicing with kids, omega juicer, tom malterre broccoli
 See the crevice between “OPEN” and the dial? It was a sticky mess, until I figured out how to clean it.
We love our Omega Juicer. It cranks out vibrant juice, especially our favorite – green juice. It’s so much easier to clean than our previous Breville and Oster juicers.
But, I have to admit that I have had trouble with the “OPEN” and “CLOSE” dial getting sticky and requiring more muscle weight than I have to turn the dial to release the pieces.
I had a feeling it was sticky from juice and needed to be cleaned, so I started out with a cotton swab, but just couldn’t get into all the small spaces.
One day, I realized that warm water would probably dissolve the sticky residue inside the dial. So, I warmed some water in my tea kettle and poured it over the dial, aiming between the dial and the body of the juicer. After each pour, I twisted the dial and after a few times it was moving smoothly again. I don’t know why I didn’t think of that earlier when I was risking a pulled muscle, but there you go!
We juice almost every day. It’s a part of our day that we look forward to. The kids are involved. Most of the time, our 4 year old son is the one who does the juicing. Sometimes our older daughter does it and our toddler enjoys watching (and drinking), too!
 Our oldest daughter giving green juice to our youngest at just 16 months
I’ve been enjoying videos by Dara Dubinet and Dan McDonald and recently watched one on juicing cilantro and pineapples, then adding that to coconut water. I thought it sounded like an amazing combination, so I modified our regular daily juice and came up with this variation.

The flavor of this Cilantro Limeade knocked my socks off!
Cilantro Limeade
Juice all ingredients, alternating between ingredients as you go. We like to juice the citrus last to clean the juicer.
Here’s the video that inspired me to make my Cilantro Limeade.
I also love this video on the importance of broccoli in the diet to detoxify from air pollution from Tom Malterre, MS, CN, one half of Whole Life Nutrition and the blog Nourishing Meals. Our green juices almost always contain a broccoli stalk and we eat broccoli several times a week.
If you try the Cilantro Limeade, let me know if you like it. I’d also love to know what your favorite green juice is!
06 Thursday Feb 2014
Posted in Blog
 Festive Chickpea Tart (using a Wholly Wholesome spelt crust)
For most of my adult life, when I had to cook for myself, I was never any good at cooking vegetables. When I had my first baby I knew I needed to do a little better by her. Vegetables are important and so I had to figure out how I was going to start cooking them in a way that would make us say “YUM!” and not the other Y word!

Jerk Chickpeas
Enter vegan cookbooks. What better way to learn how to make vegetables delicious than to turn to cookbooks all about vegetables? The recipes had to be good for folks to base their entire diets around them, right?
So, I started out by buying two vegan cookbooks in late 2007. The first was Veganomicon by Isa Chandra Moskowitz and Terry Hope Romero and the second just days later was Eat Drink and Be Vegan by Dreena Burton. I love Veganomicon, but there was something about Dreena and her book that I was drawn to. Dreena is a mom and creates the most flavorful and creative recipes – these are things I could identify with! If I remember correctly, the first meal I made from Dreena’s book left my husband saying that if this was what eating vegan was like, there was no turning back. 🙂

Coconut Banana Muffins
And the rest is history. It didn’t happen overnight, but we slowly transitioned from the standard fare to a mostly plant-based diet (which we have now been doing for over three years). Eating this way is so delicious and indulgent. I’ll speak for myself and say that I do not miss what we used to eat and I feel healthier than ever.

Beans ‘n’ Greens Soup with Sweet Potato Biscuit*
Dreena released her fourth book, Let Them Eat Vegan, in 2012. I must admit that I jumped at the chance to receive a complimentary book from Dreena. I was so excited to share all my cooking experiences with you because I knew it would be a great book. Unfortunately, the week that I received the book, I fell ill with morning sickness and was away from the kitchen for the next several months. However, now that we’ve been cooking (almost daily) from Dreena’s book, I have a lot of feedback to share.

Cocoa Cookie Dough Balls
My two older children love Dreena’s recipes. They are 8 and 4 and ask whenever I make something new “Is this a Dreena recipe?” Then, they agree that you can never go wrong with a “Dreena Burton recipe”. So very cute. And, it’s true. Our youngest little girl is 14 months old now, and she is also a fan!

Chocolate Lovers Ice Cream (with marshmallow sauce*)
Let Them Eat Vegan has remained a countertop favorite for the past year. I have made at least 40% of the recipes in it and cannot think of one that was just so-so. Seriously.

No-Fu Love Loaf
Here are just a few of our favorites:
In addition to delicious flavor combinations seasoned to perfection, Dreena includes information about whole foods, smoothie how to, and helpful baking tips. What I find really helpful about Dreena’s recipe writing style is that in each recipe she gives you very detailed tips about how to make the recipe turn out great. She also includes notes on substitutions, including her preferences. It’s as if you are inside Dreena’s head!

Cardamom Scented Peach Ice Cream (from Dreena’s website)
This last photo I will leave you with is not a recipe from Let Them Eat Vegan, but from her blog, Plant Powered Kitchen. The flavor combination of peach and cardamom was wonderful!
Dreena’s book, Let Them Eat Vegan, is a wonderful resource for plant-based cooking that is appropriate for ANY kitchen. The recipes are well-loved by the adults AND children in our house – give it a try in yours! I also own Dreena’s three previous cookbooks – Eat Drink and Be Vegan, Vive Le Vegan and The Everyday Vegan – and cannot wait for her fifth book she is working on right now!
*sweet potato biscuit and marshmallow sauce are not recipes in Let Them Eat Vegan
31 Friday Jan 2014
Posted in Blog
Tags
cold weather food, eat drink and be vegan, homemade wheat pita, Nourishing Meals, vegetable stock, winter, winter fruit salad

Homemade vegetables getting ready to be made into stock!
In addition to making yogurt, I’ve been making a lot of homemade stock lately. I make a wide variety of soups all winter long, many from my two favorite cookbooks Let Them Eat Vegan and Nourishing Meals. Here is a wonderful vegetable stock I made last week. I cooked it on low in my slow cooker for about 12 hours. It called for a lot of nontraditional stock ingredients such as greens and turmeric root and I loved the results. I used it in a beloved sweet potato miso soup and it really elevated the flavors.

Beautiful winter salad with berries, citrus, pomegranates, cacao nibs, hemp seeds, nuts, pears…
Here is a beautiful winter fruit and nut salad that I’ve been making for the past month. The recipe and inspiration comes from Ali Segersten at Whole Life Nutrition. If you don’t have their book, Nourishing Meals, yet – you must get it! There are so many delicious and incredibly healthy recipes, plus invaluable information about nutrients and children’s health. I consider Ali and her husband, Tom Malterre, MS, CN, to be forward thinking and love their nutrient dense approach.
I use Ali’s recipe as a base, but then I add a drizzle of honey and grated ginger. I think the ginger makes this perfect for winter, since fruit can be cooling but the ginger warms it up. I usually add avocados to this salad, but for some reason they were missing when I took this picture!
 Homemade whole wheat pita with samosa filling
I’ve had a whole wheat pita recipe on my Pinterest “Savory” board since I signed up for the site. I finally gave the recipe a try earlier this week and loved the results! They were really easy to make, and I am not the bread maker in our house (my husband is). There were a few steps, and the dough took about 30 minutes to rise, but they puffed up in the oven just like they were supposed to and tasted great. The best part is that I used 100% whole wheat from a local orchard, North Star Orchard, that had a few batches of freshly milled wheat berries available at our local market last fall.
I hope you are enjoying warming foods this – very – cold winter (at least it’s cold here in the Northeastern US)! If you make any of these recipes, do let me know how you like them!
25 Saturday Jan 2014
Posted in Blog
Tags
cashew yogurt, Cashewgurt, cultured cashew cream, Euro Cuisine yogurt maker, Green Kitchen Stories, Klaire Labs probiotics
 Thick and creamy cashew yogurt with probiotics!
Join me, won’t you? Give me a high five!
Come celebrate with me.
(And, don’t laugh when you find out I’m talking about yogurt!)
I’ve been experimenting with making non-dairy yogurt for years since our family went dairy free. I’ve had little luck. The best results were with soy milk and a dairy free yogurt starter, but my coconut yogurt separated (even though it cultured and could be used like kefir), and my almond yogurt (using the belle + bella starter) didn’t culture at all (this could have been my mistake, but I followed the directions and haven’t heard back from the company yet…).
I’ve hit the jackpot now, though. And, it’s thanks to a recipe I found on the beautiful blog Green Kitchen Stories. The recipe is for a cashew-based “yogurt” named Cashewgurt…creamy and delicious on its own, but not cultured.
For the past three years, I’ve been buying – with hesitation as I stand in the market with my three children scratching my head – coconut and almond milk yogurt. I never really liked the taste (especially after eating my homemade cow’s milk yogurt). The texture was a little too gelatinous and they were all way too sweet.
But, I wanted the probiotics in our diet.
And, we all really enjoy yogurt, granola and berries – for breakfast and snacks.
After experimenting and reading stories online and offline about what works and what doesn’t when making non-dairy yogurt, I found that there needed to be a sugar source (to feed the bacteria) and something to hold the mixture together (cornstarch, agar agar, tapioca, psyllium, etc). Once I made the Cashewgurt, I realized that this recipe had those two things (dates and psyllium husk powder). And, when using soaked cashews with a pretty minimal amount of water, the texture was thicker than a non-dairy milk.
So, voila!, there you have it. The bonus is that there is no need to heat and cool the mixture, as in traditional yogurt recipes.
 See how thick? It’s really creamy and so close to Greek yogurt!
Cultured Cashew Yogurt – Directions:
Since I didn’t create the recipe upon which this yogurt is based, I will link to it here.
1. Follow the Cashewgurt recipe directions (adding a few extra tablespoons of water to the mix) up to refrigerating.
2. Instead of refrigerating, at this point I added 1 tsp of a high quality probiotic (I used dairy-free Klaire Labs infant probiotic powder) and mixed it in thoroughly.
3. Pour the mixture into yogurt glasses for a yogurt maker (you could also use a larger glass container if you prefer to use a dehydrator). [I am not familiar with any other method, such as the slow cooker or thermal blanket, so I don’t know if they will work. The mixture needs to stay around 110-120 degrees to culture. I mixed mine up after dinner around 7pm, added to my yogurt maker and left it there overnight.]
4. Remove the yogurt from the maker in the morning and place in the refrigerator to cool down (it will also continue to set).
The result will be a thick and creamy cashew yogurt – very similar to Greek dairy yogurt. If you don’t like your yogurt thick, then just add more liquid when mixing it initially, or add water and mix after taking it out of the refrigerator.
Notes:
If you make the yogurt, please let me know how it turns out! I am here to troubleshoot, too. 🙂
A quick housekeeping note: I’ve updated the Books page with tons of great new books I’ve read. I haven’t added the links yet, but you can search by title and author. Enjoy!
02 Saturday Nov 2013
Posted in Blog
Tags
chef amber shea, fair trade chocolate, fall, homeschool, napping, roasted tomato soup, simple mom, theo chocolate
I wrote this post a while ago, and it’s been sitting as a draft for several weeks. It’s had good company with many other drafts, sitting for months…I do hope to write more regularly around here soon. As an update to “what I’m thinking” below, we have had changes in napping – for the better! Motherhood is just amazing as life unfolds before me…sometimes the greatest effort is not meant to be and things happen on their own. Onward…
What I’m thinking: Cooking, while happening every day, is still taking a backseat to other things in our home. I usually have enough food to feed us, but not as much surplus as I’d like! Napping – usually not me, unfortunately – is a top priority. Have you ever constantly “chased the nap” with a child who doesn’t care to sleep during the day? I did have a realization yesterday that despite my attempts and love of the outdoors we are not getting enough outdoor time. And, I am placing too much emphasis on the nap and not on life. If I flip those things around, the sleep will come, right? Anyone care to back me up on this theory? I know that it shouldn’t be this hard.
What we’re doing: Learning and reading, along with our children, is a constant. Our rich homeschool curriculum, courtesy of Ambleside online, coupled with a pretty amazing new Charlotte Mason-inspired co-op has us reading, discovering, handicrafting, running…
Our nature study walk earlier this week (updated: a few weeks ago) led us to a surprise chestnut tree, bearing smooth gifts inside the spiny and prickly balls. What a treat to walk under this immense tree and collect chestnuts that had fallen and also try to pry open the cracked sharp balls that protect the chestnuts. We had a wonderful time foraging and I remembered how my great grandmother had a chestnut tree in her yard.
We took the air conditioning units out of the windows last weekend (updated: a few weekends ago). Exhale now. Except…just one tiny problem…the heat and humidity came back! This week (updated: actually, that was a couple weeks ago) was met with highs in the 80s with humidity near the 90% mark. A great big “ugh” from me. I was just getting into the swing of roasting in the oven and soup making in my beloved enameled cast iron pots. More to come…patience, my dear. (updated: most days are now cool; nights are for socks now!)
A chili contest at our local library. We’re so proud of daddy for entering. What a great time he had dishing out chili to friends and hearing many lovely compliments.
What I’m feeling: It’s finally fall and I’m slowly settling back into myself. It’s a time of year that I relish (too short in the Northeast as the temps dip very quickly after the heat and humidity of the summer). This is a time of reflection for me, as well as a time of change in attitude. Overcoming disappointments is difficult when the body is out of balance (as mine is in the summer) and so as I take the upward swing, I can see action plans abound with how to deal with challenges. I will be OK. We will be OK and move forward. Life has been great to us; we have amazing things ahead of us. We are blessed.
 What I’m cooking: This stir fry was made over the summer. I could not resist taking a photo of the amazing colors. Talk about eating the rainbow. I just look at this and feel my pains go away.
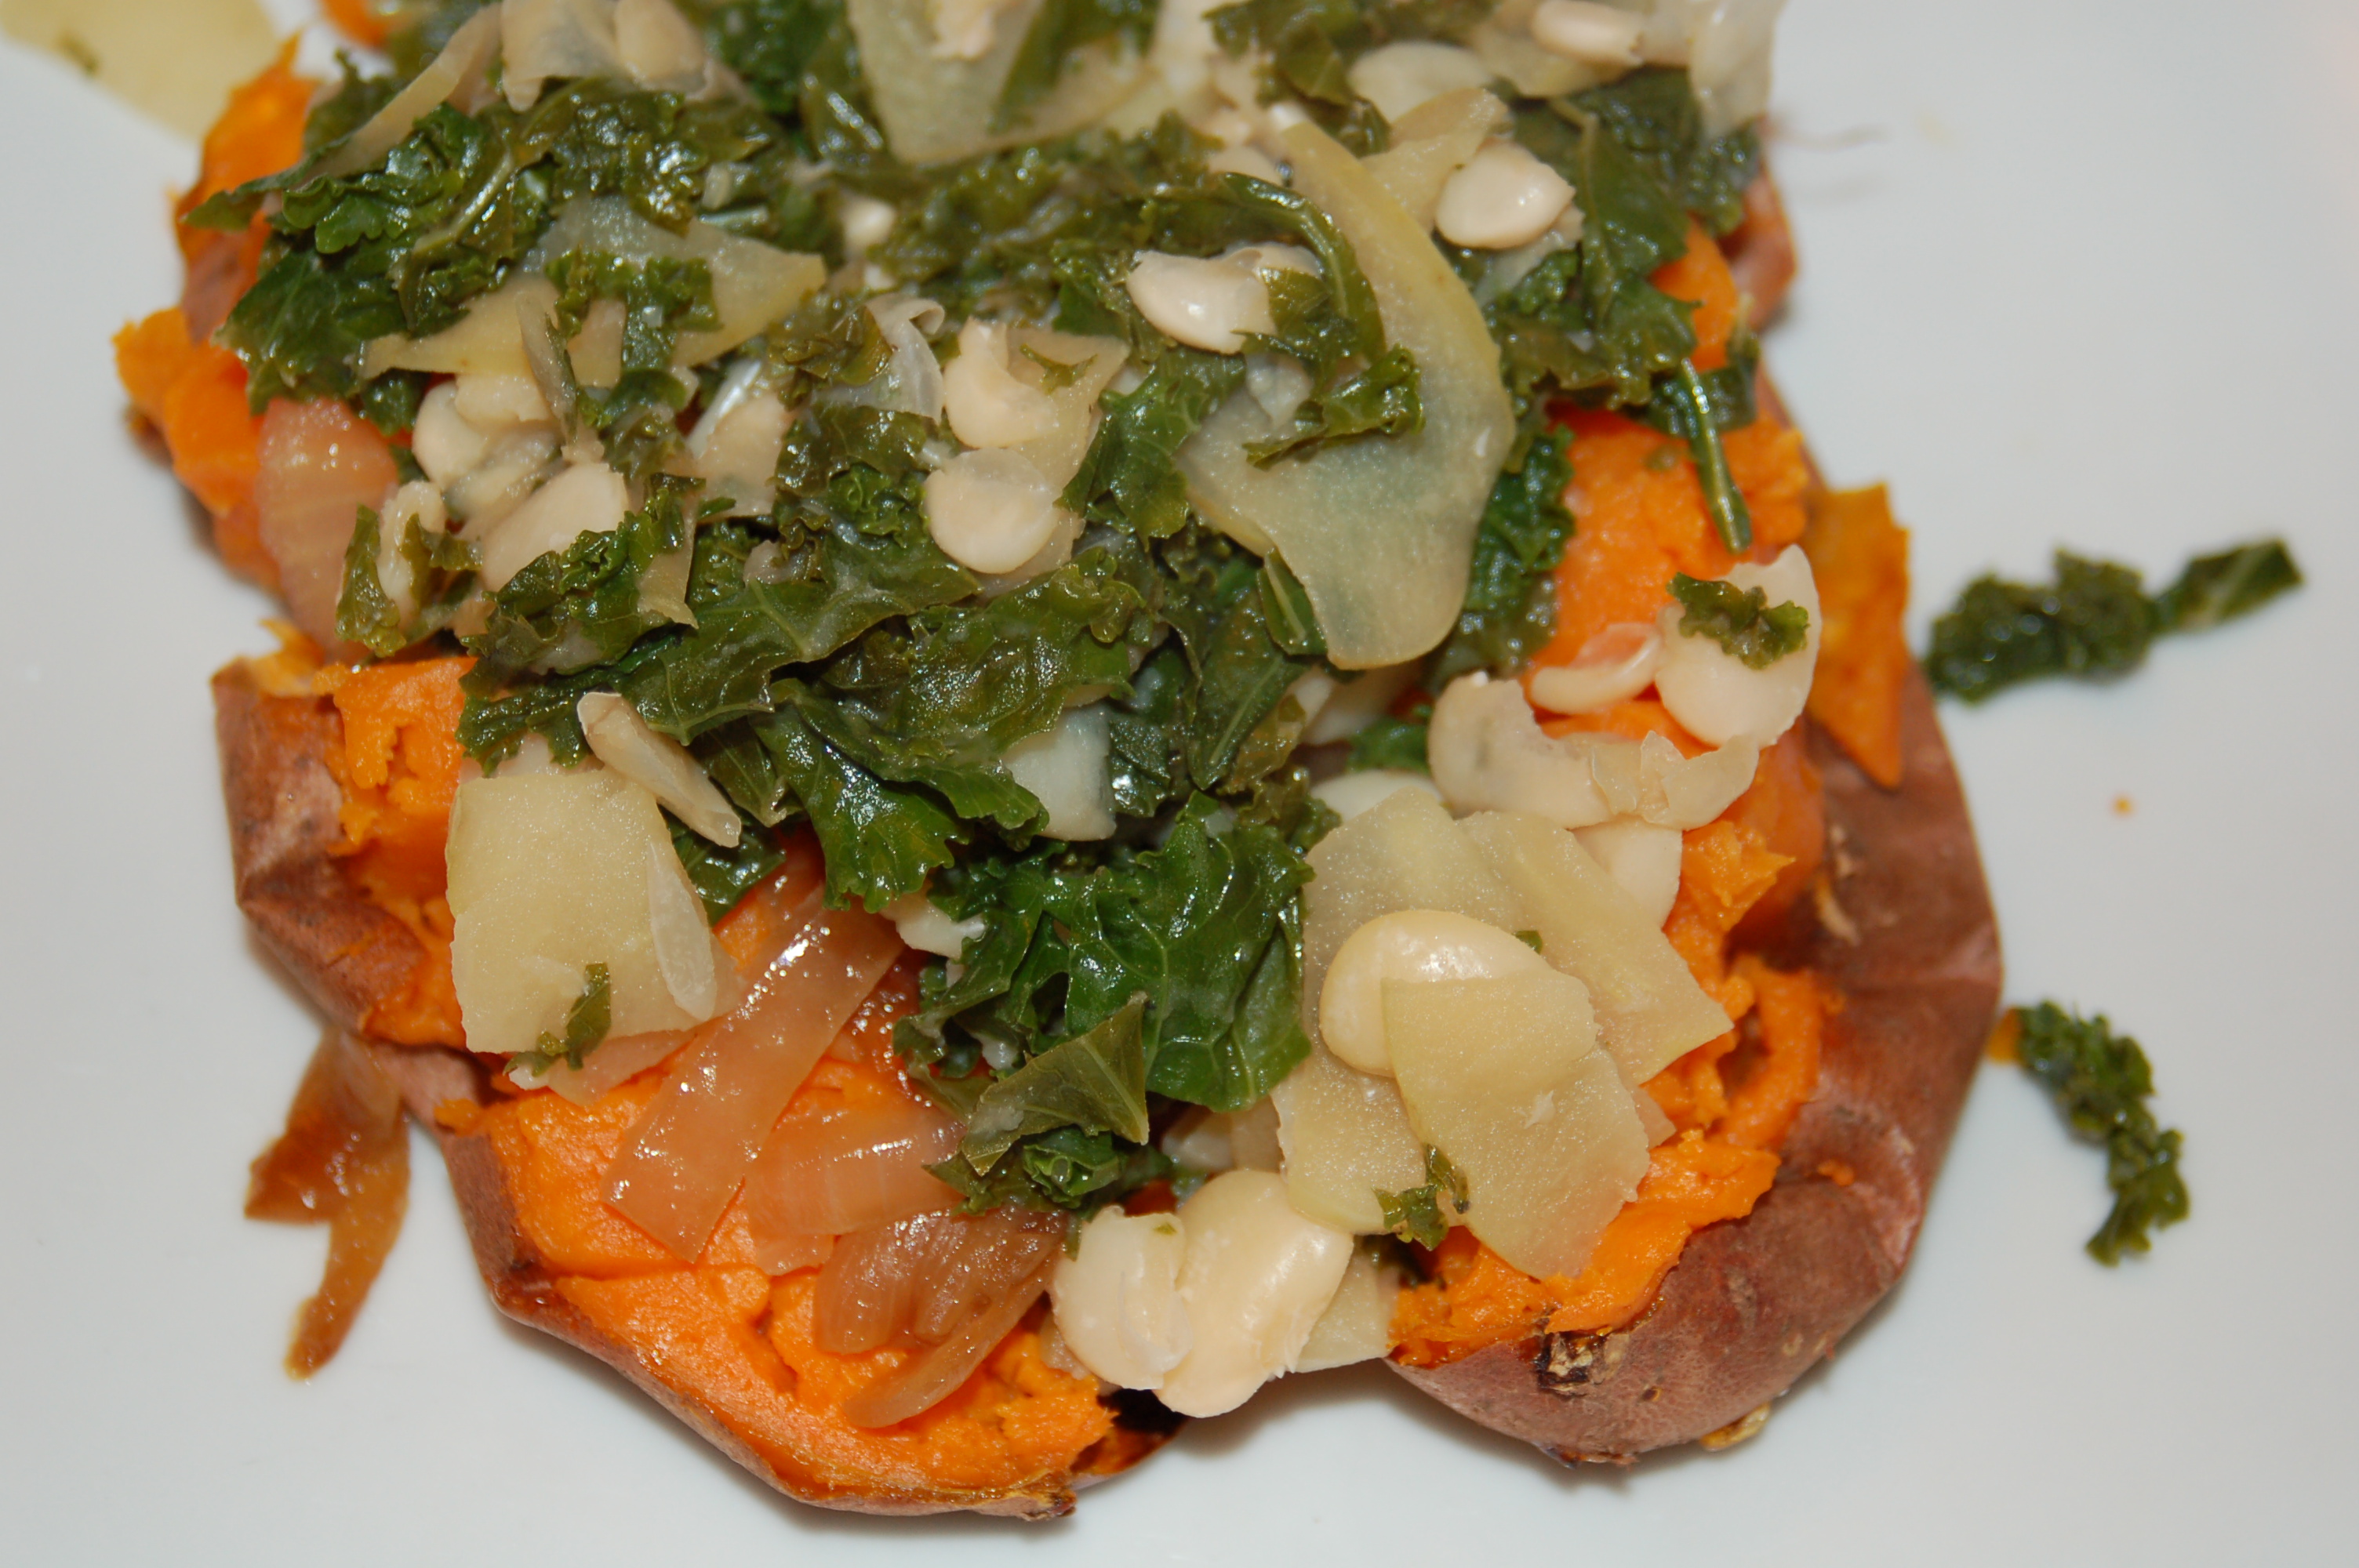 This slow baked sweet potato (baked almost two hours and incredibly soft and sweet) was topped with a kale, apple and butter bean saute. You can see the caramelized onions peeking out underneath. We love to put caramelized onions on everything!
 And, this picture shows the lime cilantro cashew cream sauce that was drizzled on top. A big hit with everyone.
 Rosemary onion socca. Have you made socca before? It’s a gluten free, vegan cake-like flatbread that is so easy to make. Add a few ingredients to your blender, pour into cake pan, add a few more ingredients and bake! Total time takes about 40 minutes. This is a nice side to the one pot meals we make. Last night (updated: a few weeks ago) I made a caramelized onion version of it to go with our roasted tomato soup (really delicious – well worth the effort). This is the socca recipe I use. I have never let it sit for the two hours and it turns out great.
 A very dear friend of mine, trying to reduce lunchtime dishes, suggested this wonderful idea to have a dip and veggies. Here’s an example of one of our lunches. The kids loved this idea! I loved the reduced amount of dishes, of course. The dip above is one of our favorites from Dreena Burton, Eat Drink and Be Vegan. It’s the sun dried tomato and olive version.
I’ve been making this caramel apple dip nonstop. It’s really delicious. I’ve used it as a dip for apples and asian pears, and also as a frosting for cupcakes. And, as a super special treat, I have been dipping pieces of my favorite chocolate – Theo 70% dark chocolate – into it. It reminds me of the caramello bars of my youth that I wouldn’t touch now (too many junk ingredients and GMOs). We love Theo chocolate because it is organic and fair trade. We’ve been having dinner table conversations about fair trade lately. It’s a lot for an almost 8 year old and 4 year old to grasp, so we are keeping it basic while introducing awareness to the importance of buying fair trade. Simple Mom’s Tsh wrote about the importance of fair trade chocolate recently, in anticipation of the big chocolate holiday Halloween (updated: how was your Halloween?). A really important piece worth reading.
What I’m reading: Although this blog post by Chef Amber Shea is months old, I was touched by it and wanted to share. No exclusionary labels.
The New Persian Kitchen by Luisa Shafia – my eyes have been opened to Persian cooking and I’m so trying these recipes! I love the colors in this book, the flavor combinations and the philosophy behind Persian cooking.
Money, a Love Story by Kate Northrup – I have been a fan of Dr. Christiane Northrup since I was a teenager and read Women’s Bodies Women’s Wisdom when it was first published. Dr. Northrup’s daughter, Kate, wrote a book about money and our relationship to it. This is on my to read list, for sure.
As a long time fan of Leo Babauta of Zen Habits, I’m soaking up all he says about unschooling on his new blog Unschoolery. It all resonates with me. In many ways, I find him to be the voice of the future of education.
Celebrate the beauty of real, whole foods with me this Fall. What are you cooking/reading/thinking?
12 Wednesday Jun 2013
Posted in Blog
 A peek into our lunch salad bowl. Look at all those gorgeous colors!
With a new baby – just over seven months already! – finding the time to cook has been one major challenge. But, it’s one task that I cannot let fall to the wayside, especially when I have three other hungry people to feed (four, if you include me, and this nursing mama is always hungry!). So, I am constantly tweaking (read: simplifying) my food plan. If I find something that works, like these delicious salads I’m about to show you, I keep making variations of them throughout the season.
I know it’s almost summer, but I’ll call these spring salads because I’ve been making them for the past month or more. You can start with these salads as a base, then change out ingredients as you wish, based on what is in season or what your family likes. The flavors are tangy and sweet, but not overly so.
The best part about these salads is that they are so appealing to kids!
When I make them for lunches, this is our lunch.
That’s it! Simple, and they love it. If I could offer my best tip to get kids to eat salads like these: make an irresistible dressing. (A second tip would be to season along the way. I like to sprinkle sea salt or Herbamare on my salad before I dress it…not necessary, but I find the flavors of each ingredient pop.)
The first salad is a green salad (there’s nothing better than fresh tender lettuce growing outside the back door) with a blueberry vinaigrette. There are so many wonderful layers to this salad, from bottom to top: garden lettuce, sliced cucumbers, farm fresh sugar snap peas, pecans, avocados, peaches and of course some more blueberries.

The second salad is a quinoa salad with orange vinaigrette. I have made so many variations of this salad, including using two different orange vinaigrettes. One of the vinaigrettes is from my beloved Nourishing Meals.
This first take was made using red and white quinoa with cucumbers, peaches, red onions, scallions, red bell peppers, chopped basil and avocados.
 The second take was with red and white quinoa, but this time with mangoes, grape tomatoes, scallions and white beans.

And, the third take will give you an idea of one of my child’s plates. The quinoa is on a bed of lettuce with peaches, cucumbers and avocados. That’s a dollop of homemade hummus on the left. This may not seem like a lot, but I always start out with a smaller portion of whatever I give them, then offer more. I don’t feel comfortable forcing them to eat large portions of food, if I have overestimated how hungry they were.

I have so many things to write about here, but not so much time lately! But, the last thing I will share today is how we are feeding our baby girl. We’ve decided to do Baby Led Weaning with her, and it’s working out so well! I truly believe this is a great way to introduce her to many different textures and flavors of the delicious foods we eat, while allowing her to decide how much food to eat.

Warning: Baby Led Weaning is not for the faint of heart! It’s a messy endeavor! 🙂
We are slowly introducing various whole foods to her (breastmilk is still her main source of nutrition): some cooked, some raw – all cut to size so she can pick them up and feed herself. No purees necessary! With that said, I did just make a batch of my homemade applesauce and she did a fine job feeding herself with a small wooden spoon. She loved the applesauce, almost as much as she loved chewing on the spoon!
I hope you enjoyed our salad ideas! For more excellent recipes and ideas on how to introduce meal-sized salads to your family, check out my friend Renee’s ebook Eat This: Meal Salads and Whole Food Dressings.
From our kitchen to yours,
Happy Eating!
22 Monday Apr 2013
Posted in Blog
Tags
My daughter, age six at the time, drew this picture.
 She showed it to me one morning. It took me by surprise and touched me deeply.
We talk a lot about our earth – how we should tread lightly, appreciate all the beauty, and leave outdoor spaces in better shape than we found them.
All this time, I wondered if she was listening. And, now I know she was.
Please join us in making every day Earth Day.
xo,
from our family to yours
21 Friday Sep 2012
Posted in Blog
Tags
asian flavors, greens, lunch, moosewood restaurant cooks at home, quick lunch, side dish, swiss chard
Have you ever had greens in the fridge that you needed to use, but were stumped on what to do with them? I had swiss chard that I wanted to use today, and came up with this recipe. If you don’t have swiss chard, but do have kale, collards or spinach, that’s fine. I think any greens will do.
This is a simple recipe that is full of bold flavors. I made it for lunch (it would also make a great side dish, with or without the baked tofu). My kids gobbled it up, had seconds and asked for more, but there were none!
Eating a lot of greens is a goal of mine this fall to help keep our immune systems in top working order. I’m working on a post that will detail my plan to keep us healthy – it’s coming soon!
This recipe was adapted from the Moosewood Restaurant Cooks at Home cookbook.
Ginger Tamari Greens with Baked Tofu
Heat oil in skillet. Saute ginger and garlic in oil for about minute or two. Add swiss chard ribbons and cook until wilted (just a couple minutes). Add diced tofu. Sprinkle with tamari and lime juice; stir. Add optional coconut nectar; stir. Add cilantro and serve.
You can serve over brown rice or other grain. We just had it on its own.
